设为首页
优惠IDC
收藏本站
六狼博客
六狼论坛
开启辅助访问
切换到窄版
用户名
Email
自动登录
找回密码
密码
登录
立即注册
只需一步,快速开始
只需一步,快速开始
快捷导航
门户
首页
BBS
云计算
大数据
手机
移动开发android,ios,windows phone,windows mobile
编程
编程技术java,php,python,delphi,ruby,c,c++
前端
WEB前端htmlcss,javascript,jquery,html5
数据库
数据库开发Access,mysql,oracle,sql server,MongoDB
系统
操作系统windows,linux,unix,os,RedHat,tomcat
架构
项目管理
软件设计,架构设计,面向对象,设计模式,项目管理
企业
服务
运维实战
神马
搜索
搜索
热搜:
php
java
python
ruby
hadoop
sphinx
solr
ios
android
windows
centos
本版
帖子
用户
六狼论坛
»
首页
›
操作系统
›
Ubuntu
›
ARM+LINUX移植攻略(一) U-boot-2009.08移植TE2440II开 ...
返回列表
查看:
172
|
回复:
0
ARM+LINUX移植攻略(一) U-boot-2009.08移植TE2440II开发板--环境搭建
[复制链接]
helloyesyes
helloyesyes
当前离线
积分
2850
窥视卡
雷达卡
升级
92.5%
当前用户组为
探花
当前积分为
2850
, 升到下一级还需要 150 点。
932
主题
932
主题
932
主题
探花
探花, 积分 2850, 距离下一级还需 150 积分
探花, 积分 2850, 距离下一级还需 150 积分
积分
2850
发消息
楼主
|
发表于 2013-2-7 07:37:21
|
显示全部楼层
|
阅读模式
哈尔滨理工大学软件工程专业08-7李万鹏原创作品,转载请标明出处
http://blog.csdn.net/woshixingaaa/archive/2011/01/30/6170200.aspx
平台:
虚拟机:VirtualBox Ubuntu 9.10
文件传输工具:SSHSecureShellClient-3.2.9
交叉编译环境:arm-linux-gcc-4.3.2
与开发板通信:tftp
Uboot移植步骤一:
建立交叉编译环境:arm-linux-gcc-4.3.2
1.将arm-linux-gcc-4.3.2.tgz复制到任意路径下;
2.确保安装了标准C开发环境,sudo apt-get install build-essential libncurses5-dev;
3.在终端进入arm-linux-gcc-4.3.2.tgz存放目录,再sudo tar -zxvf arm-linux-gcc-4.3.2.tgz -C /(注意大写C字母后留一个空格),这样会自动解压到/usr/local/4.3.2目录下);
4.修改环境变量,使交叉编译环境生效。
vim ~/.profile
在这个文件最后添加上自己的环境变量:export PATH=$PATH:/usr/local/arm/4.3.2/bin
然后在终端执行source ~/.profile ,即可立即生效。
5. arm-linux-gcc -v
Using built-in specs.
Target: arm-none-linux-gnueabi
Configured with: /scratch/julian/lite-respin/linux/src/gcc-4.3/configure --build=i686-pc-linux-gnu --host=i686-pc-linux-gnu --target=arm-none-linux-gnueabi --enable-threads --disable-libmudflap --disable-libssp --disable-libstdcxx-pch --with-gnu-as --with-gnu-ld --enable-languages=c,c++ --enable-shared --enable-symvers=gnu --enable-__cxa_atexit --with-pkgversion='Sourcery G++ Lite 2008q3-72' --with-bugurl=
https://support.codesourcery.com/GNUToolchain/
--disable-nls --prefix=/opt/codesourcery --with-sysroot=/opt/codesourcery/arm-none-linux-gnueabi/libc --with-build-sysroot=/scratch/julian/lite-respin/linux/install/arm-none-linux-gnueabi/libc --with-gmp=/scratch/julian/lite-respin/linux/obj/host-libs-2008q3-72-arm-none-linux-gnueabi-i686-pc-linux-gnu/usr --with-mpfr=/scratch/julian/lite-respin/linux/obj/host-libs-2008q3-72-arm-none-linux-gnueabi-i686-pc-linux-gnu/usr --disable-libgomp --enable-poison-system-directories --with-build-time-tools=/scratch/julian/lite-respin/linux/install/arm-none-linux-gnueabi/bin --with-build-time-tools=/scratch/julian/lite-respin/linux/install/arm-none-linux-gnueabi/bin
Thread model: posix
gcc version 4.3.2 (Sourcery G++ Lite 2008q3-72)
步骤二:
搭建tftp
1、安装server与client
sudo apt-get install tftpd tftp openbsd-inetd
2、新建inetd启动文件
sudo gedit /etc/inetd.conf
tftp dgram udp wait nobody /usr/sbin/tcpd /usr/sbin/in.tftpd /home/hacker/tftpboot # /home/hacker/tftpboot为tftp主目录
3、重新启动inetd服务
sudo /etc/init.d/openbsd-inetd start
4、测试tftpd服务是否成功
tftp localhost
tftp> verbose
应该显示:Verbose mode on.
tftp> trace
应该显示 Packet tracing on.
在/home/hacker 建立tftpdown目录
mkdir /home/hacker/tftpdown
新建文件 2.txt 设置权限
touch 2.txt
chmod 777 2.txt
在 /home/hacker/tftpboot中
新建文件 1.txt
touch 1.txt
chmod 777 1.txt
chmod 777 tftpboot
chmod 777 tftpdown
tftp>get 1.txt 从tftpboot接受文件
如果想向tftpboot上传文件,先在tftpboot中建一个空的2.txt
然后 tftp>put 2.txt
步骤三:
1.首先查看Ubuntu的IP地址,在windows下可以Ping通
2.开启SSH服务,实现linux与windows之间的文件传输
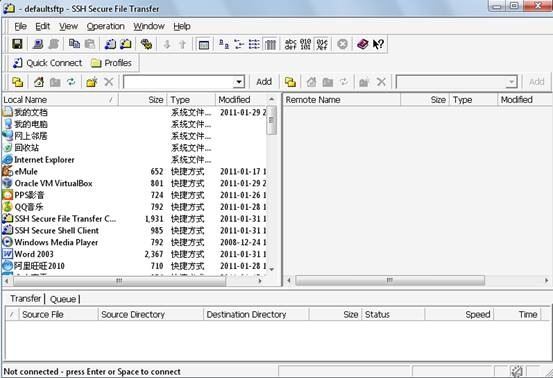
Windows中,从网上下载SSHSecureShellClient-3.2.9,界面如图:
3.Ubuntu中如果使本机开放SSH服务就需要安装openssh-server
sudo apt-get install openssh-server
然后确认sshserver是否启动了:
ps –e |grep ssh
如果看到sshd,那说明ssh-server已经启动了。
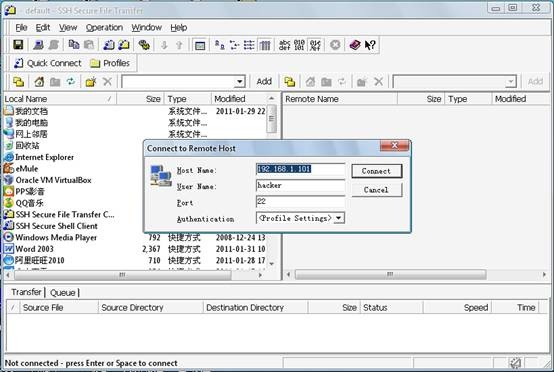
4.开启到linux连接,如下:
点击Quick connect,在对话框中根据自己的情况进行输入
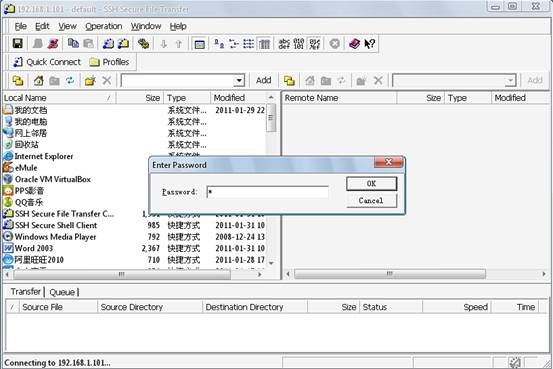
5. 输入你的密码。
6.这样就登陆成功了。
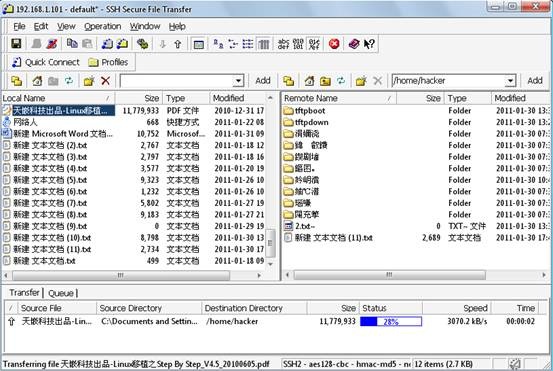
7.上传文件
回复
使用道具
举报
提升卡
置顶卡
沉默卡
喧嚣卡
变色卡
千斤顶
显身卡
返回列表
高级模式
B
Color
Image
Link
Quote
Code
Smilies
您需要登录后才可以回帖
登录
|
立即注册
本版积分规则
发表回复
回帖后跳转到最后一页
浏览过的版块
AIX
Copyright © 2008-2020
六狼论坛
(https://it.6wolf.com) 版权所有 All Rights Reserved.
Powered by
Discuz!
X3.4
京ICP备14020293号-2
本网站内容均收集于互联网,如有问题请联系
QQ:389897944
予以删除
快速回复
返回顶部
返回列表
 京ICP备14020293号-2
本网站内容均收集于互联网,如有问题请联系QQ:389897944予以删除
京ICP备14020293号-2
本网站内容均收集于互联网,如有问题请联系QQ:389897944予以删除


 窥视卡
窥视卡 雷达卡
雷达卡


 楼主
楼主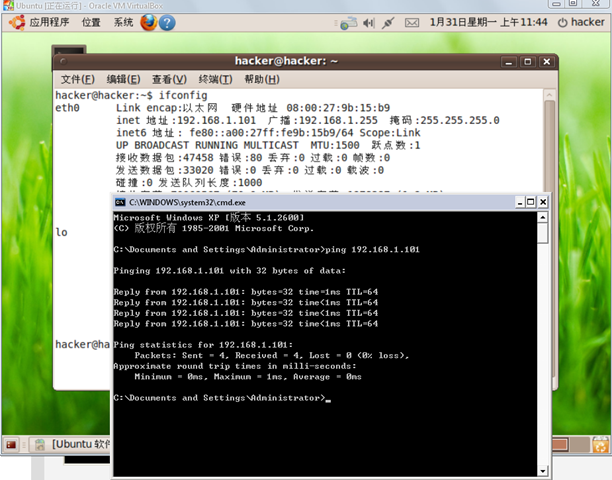

 提升卡
提升卡 置顶卡
置顶卡 沉默卡
沉默卡 喧嚣卡
喧嚣卡 变色卡
变色卡 千斤顶
千斤顶 显身卡
显身卡